Please follow these steps below when verifying / configuring your new FortiSAT service. The FortiCloud Master Support Account (and any configured sub-admins to that account) can access the new service from: https://fortisat.forticloud.com
What is migrated:
- Existing DNS TXT records (Please verify.)
- All campaign data for campaigns that have already ended.
- SMTP configurations (Please send a test email from the FortiSAT service to verify.)
- LDAP/S configurations (You will need to update the firewall rules/ACLs with the new IP address(es). Please test the connections).
What is not migrated:
- 'A' records (These must be updated to reflect the IP of the new service.)
- SSO configuration.
- SCIM configuration
- Branding settings
Below you will find instructions on performing the above tasks.
TABLE OF CONTENTS
- STEP 1 (Mandatory): Verify your DNS TXT record propagated and is verified
- STEP 2: (Recommended): Configure your Custom Domain
- STEP 3 (Recommended): Configure SAML2 Single Sign-On (SSO)
- STEP 4 (Mandatory): Configure User Default Language
- STEP 5 (Recommended): Configure User Synchronization(LDAP/S, Azure AD, SCIM (auto-provisioning))
- STEP 6 (Recommended): Configure an SMTP Relay
- STEP 7 (Optional): Configure Branding
Optionally, you can request that we assist with the validation and configuration completion of your service. In order to request help, please Click to Email
We will be assisting customers on a first come / booked, first served basis. One of our Deployment Specialists will reach out to schedule a time to assist in this effort.
NOTE: We will only accept requests from the registered tenant administrator email account.
STEP 1 (Mandatory): Verify your DNS TXT record propagated and is verified
NOTE: You MUST perform this step before performing any of the steps listed below.
1.) Log into the new FortiSAT platform from the new admin console link: https://fortisat.forticloud.com
2) From the navigation menu, select Domains under the User Management navigation menu item:
You should see the DNS TXT record entry from the previous platform and the Connection Status should show as "Verified".
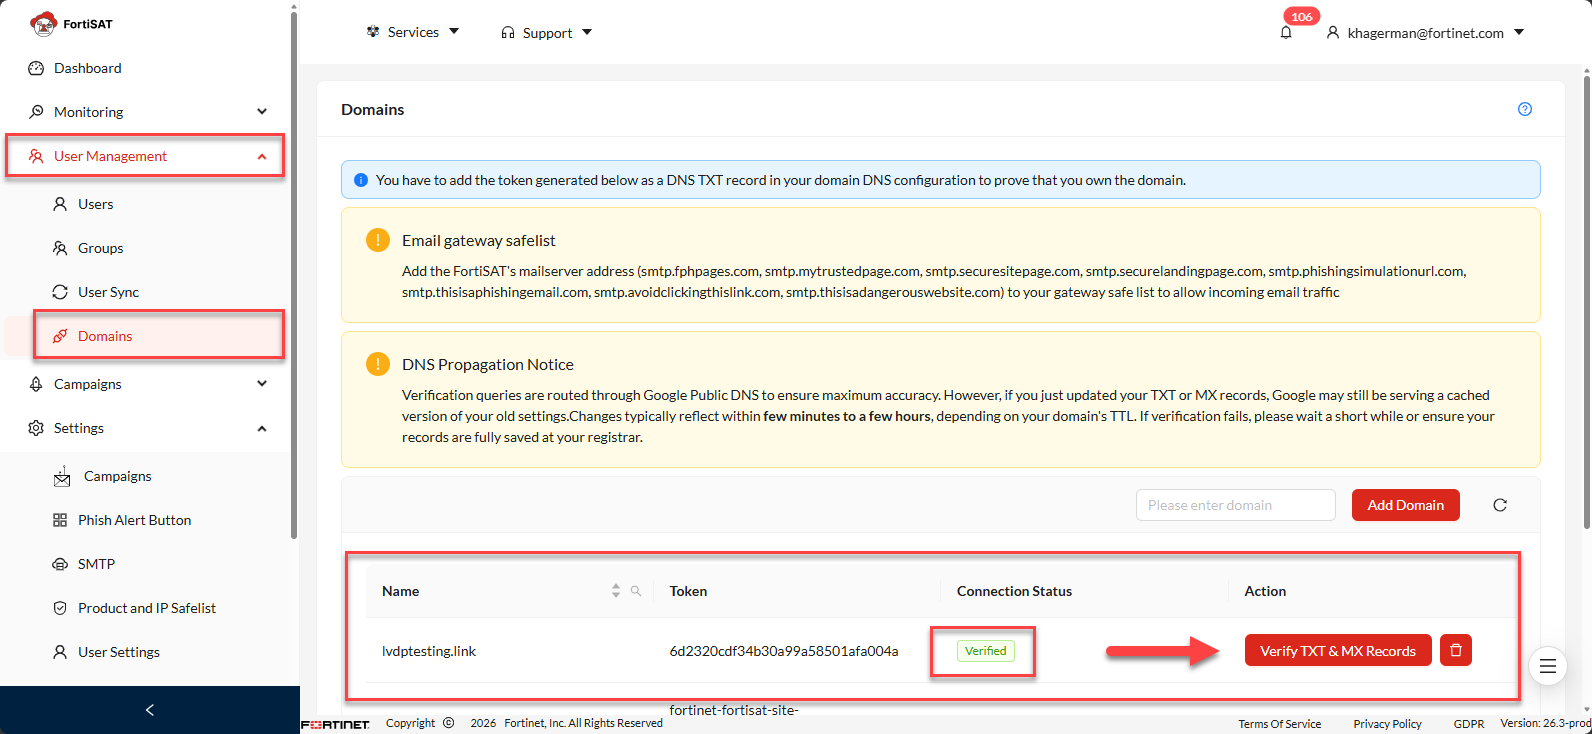
If the Connection Status does not show as "Verified", you may click the Verify TXT & MX Records button. If the domain fails to verify, you can check to ensure the DNS TXT record exists using this knowledge article:
STEP 2: (Recommended): Configure your Custom Domain
NOTE: You SHOULD perform this step before performing any of the steps listed below.
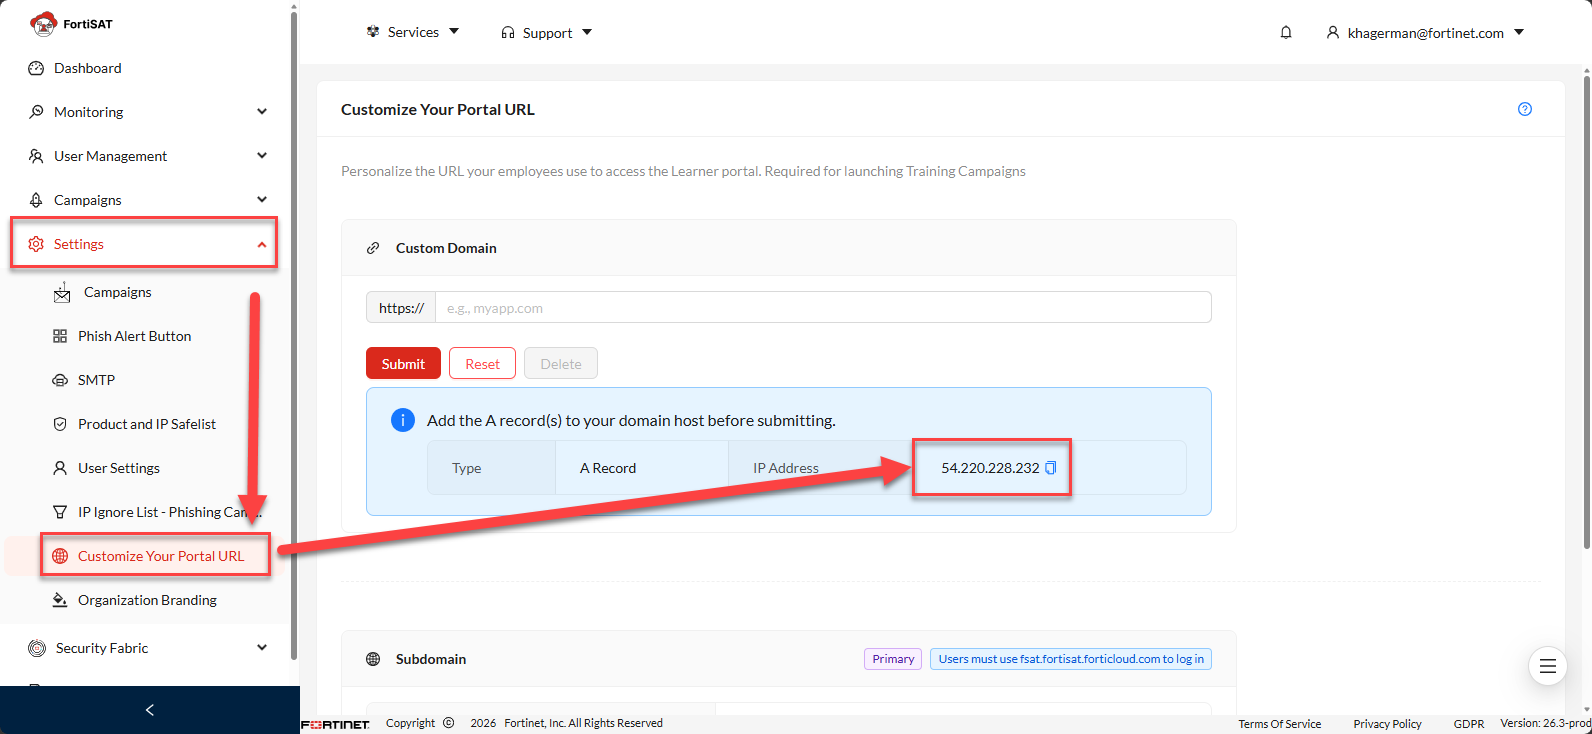
'A' records configured for the previous version of the service could not be migrated since the IP address has changed for the creation and verification of these records. The custom domain from the previous version will be migrated to the new version, however, it will not work until you delete the old 'A' records and create a new one using the new IP displayed on the custom domain configuration page.
If you plan to set a custom domain or already had one configured, you MUST perform this step before performing step 3 or step 4 as this custom domain will be used in urls for SSO and SCIM settings. If you change this setting after steps 3 and 4, you will need to create a new configuration for steps 3 and 4 to match the new custom url. If you cannot find one of these emails, one of our staff can assist in determining what this value was.
1) To determine what existing 'A' records were created for the old service, you can use this article (verifying A records) to access the existing records:
2) You will need to delete the existing records (identify using the IP addresses from step 1).
3) Create a new 'A' record using the new FortiSAT IP address. You can obtain this IP address by selecting Customize Your Portal URL under the Settings navigation menu item:
Optionally, you can request that we assist with the validation and configuration completion of your service. In order to request help, please Click to Email
NOTE: We will only accept requests from the registered tenant administrator email account.
STEP 3 (Recommended): Configure SAML2 Single Sign-On (SSO)
If you configured a 3rd party application (Microsoft Entra/AzureO365 Enterprise App or Google Workspace Web and Mobile App or OKTA, etc.), you can delete the application. Before you delete the application, take not of what groups (Microsoft) or what OUs (Google) have been mapped for access to the app. Also take note of any attribute mapping customizations you may have made for synchronization of the data. The instructions for these steps will depend on what 3rd party SSO method you configured.
NOTE: We recommend you do not update the existing application and instead, delete and create a new application using the instructions provided. Issues have been seen when modifying an existing application.
Optionally, you can request that we assist with the deletion of your existing SSO application and creation of the new SSO application. In order to request help, please Click to Email
NOTE: We will only accept requests from the registered tenant administrator email account.
STEP 4 (Mandatory): Configure User Default Language
NOTE: You MUST perform this step BEFORE creating, importing or synching users. The language set here will be applied to new users as they are imported into the system. The default language is English (US). You cannot change the language settings for users after they are imported. Users can change the default language from the learner portal after their first successful login. If a campaign contains a module that is not supported in the default or selected language, the content will be presented in English US. You can verify the supported languages for each module when creating the campaign.
STEP 5 (Recommended): Configure User Synchronization(LDAP/S, Azure AD, SCIM (auto-provisioning))
NOTE: If you had an LDAP/s configuration in the previous version, the settings will be migrated. However, if you created a firewall rule to allow access from our service, you will need to delete the existing IP addresses and add the following IP addresses to the rule:
54.220.228.232
52.49.221.140
99.81.86.32
154.52.1.119
If you did not have user synchronization in the previous version, but wish to set it up in this version of the service, follow these instructions:
Configuring User Synchronization
Optionally, you can request that we assist with the deletion of your existing SCIM application and creation of the new SSO application. In order to request help, please Click to Email
NOTE: We will only accept requests from the registered tenant administrator email account.
STEP 6 (Recommended): Configure an SMTP Relay
As a best practice, we recommend you create a user and configure an SMTP relay so that training emails (campaign assignment, overdue reminder and congratulatory completion email) come from a trusted, internal email. Users will be receiving training educating them on taking action from unknown email sources. If you do not configure an SMTP relay, user communications will be sent from: no-reply@fphpages.com Additionally, you may need to safe-list this address / domain in your SMTP server(s) mail flow to ensure the emails are received in the recipients Inbox. The sending IPs are as follows:
54.220.228.232
52.49.221.140
99.81.86.32
154.52.1.119
If you configured an SMTP relay in the previous version, your settings will be migrated. You need only verify you can send the emails to an existing users in FortiSAT:
Configuring and Testing an SMTP Server Relay
Optionally, you can request that we assist with the deletion of your existing SCIM application and creation of the new SSO application. In order to request help, please Click to Email
NOTE: We will only accept requests from the registered tenant administrator email account.
STEP 7 (Optional): Configure Branding
You can brand your portal (organization name, corporate logo (light and dark theme) and corporate logomark (favicon) (light and dark theme)). To brand your organizations FortiSAT service, follow these steps:
Branding your FortiSAT service
Optionally, you can request that we assist with the branding customization. In order to request help, please Click to Email
NOTE: We will only accept requests from the registered tenant administrator email account.
Was this article helpful?
That’s Great!
Thank you for your feedback
Sorry! We couldn't be helpful
Thank you for your feedback
Feedback sent
We appreciate your effort and will try to fix the article