*** Needs to be updated once we know what is migrated and not...
Please follow these steps below when decommissioning your Security Awareness and Training Service Tenant.
NOTE: None of the configuration settings, campaign configuration/content or learner completion data will be retained / migrated / available in the new version.
If you wish to replicate your campaign content, you should log in and take note of:
- The campaign name
- The modules assigned to the campaign
If you have currently active campaigns or have scheduled training campaigns for the future, please Click to Email
Optionally, you can request that we assist with the decommissioning of your service. In order to request help, please Click to Email
One of our Deployment Specialists will reach out to schedule a time to assist in this effort.
NOTE: We will only accept requests from the registered tenant administrator email account.
TABLE OF CONTENTS
- STEP 1 (Recommended): Retrieve all campaign and module completion data for your organization
- STEP 2 (Recommended): Delete your custom training url and associated 'A' record
- STEP 3 (Recommended): Delete your 3rd Party Single Sign-on (SAML2 application)
- STEP 4 (Recommended): Delete your DNS TXT record
- STEP 5 (Recommended): Delete your firewall rule for LDAP/S access
- STEP 6 (Optional): Delete your users
STEP 1 (Recommended): Retrieve all campaign and module completion data for your organization
NOTE: You must perform this step before performing any of the steps listed below.
Learner completion data recorded in this service will not be available / migrated to any newer version. If you do not export the data via reports, then the data will be lost when the service is decommissioned.
If you wish to have learner completion (audit) data for your campaigns, you must complete this step. If you do not complete this step, your data will be lost when this version of the service is decommissioned. Data is NOT migrated to newer versions of the platform. If you delete your users prior to performing this step, your user data metadata will be deleted.
1.) Log in to the service using the associated FortiCloud (master user) account: https://ftnt.info
This is the FortiCloud account that was used to enter the service contract / license and initialize the service. If you have forgotten your password, you will need to use the password reset link. If you still cannot access your account, you should send an email to cs@fortinet.com (from the email in question) requesting assistance recovering your account.
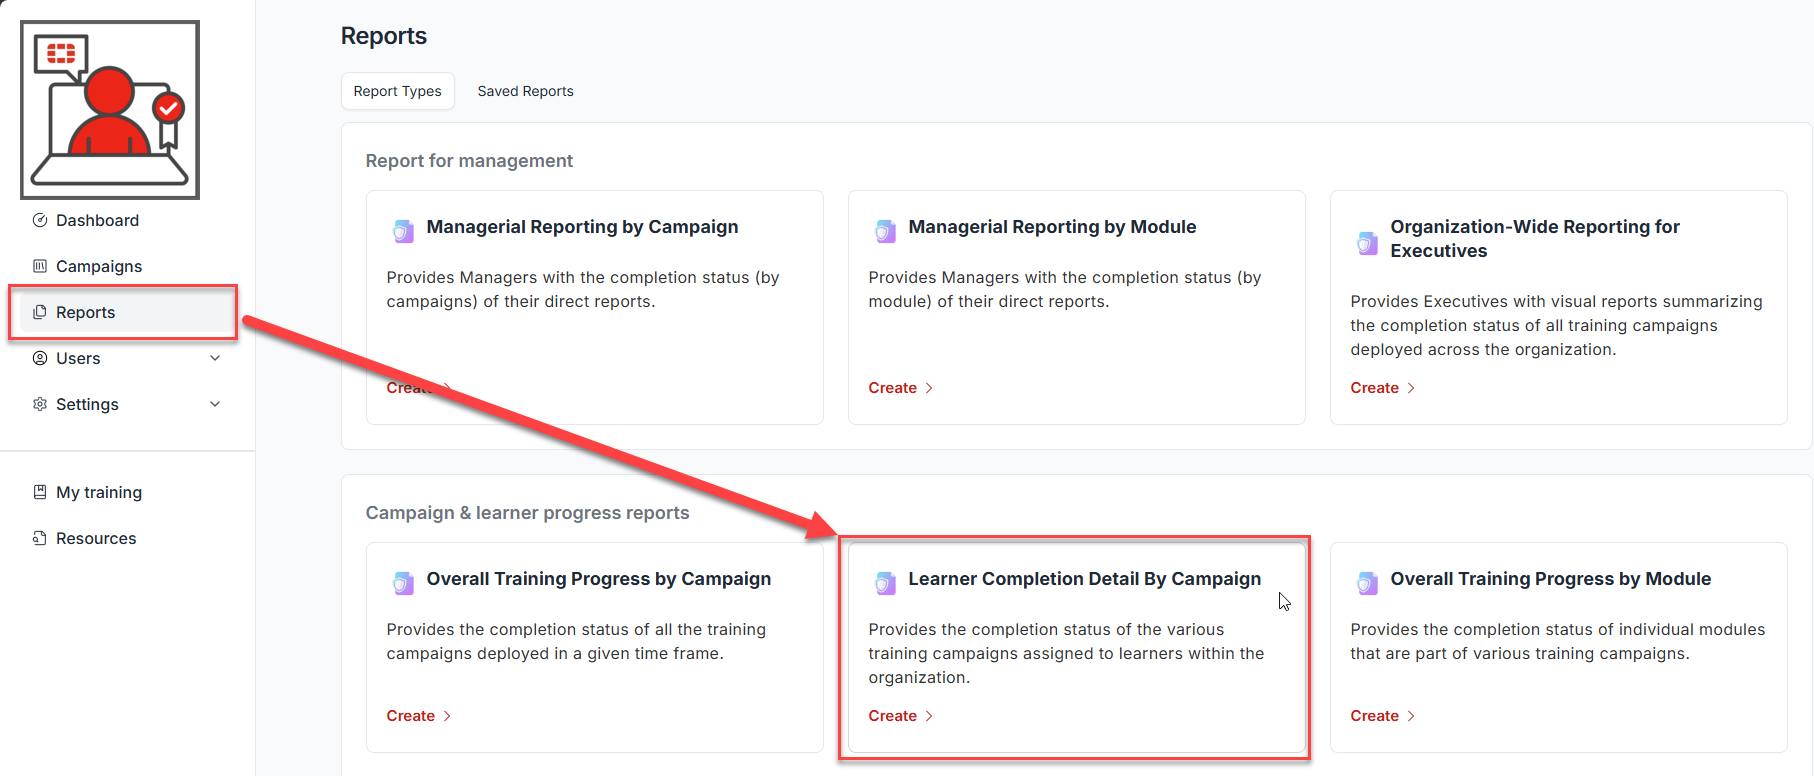
2.) Select Reports from the navigation menu, then select the Create > link in the Learner Completion Detail By Campaign report from the Report Types section:
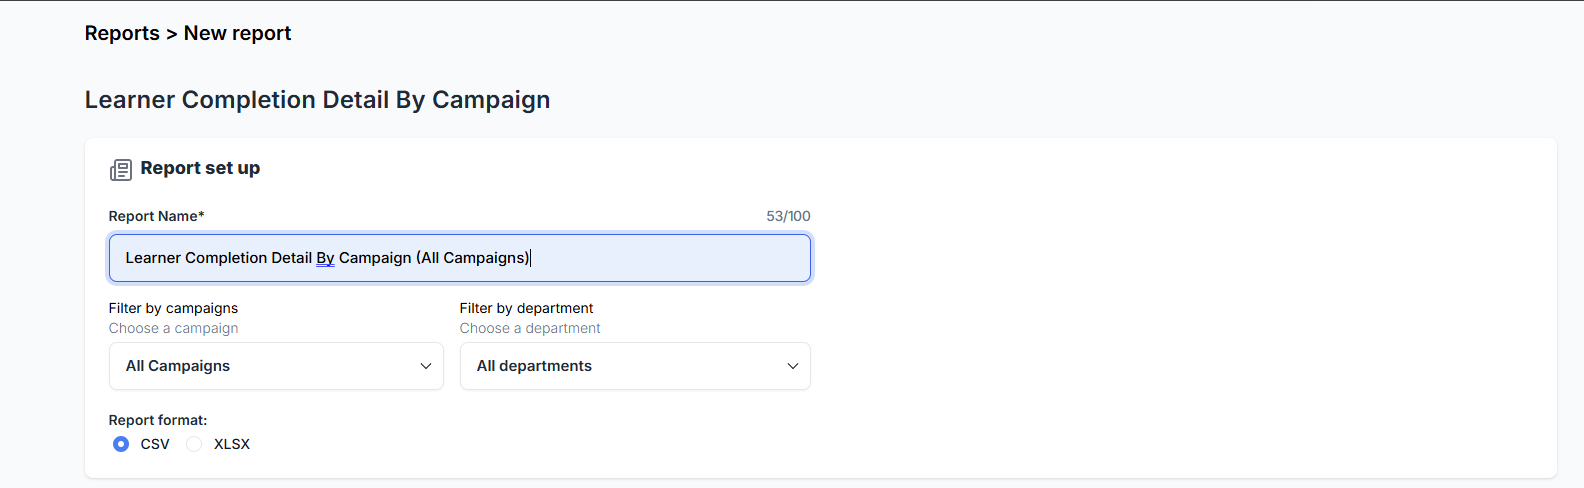
3.) Give the report a name, for example: Learner Completion Detail By Campaign (All Campaigns)
4.) Leave the Filter by campaigns set to All Campaigns and the Filter by department set to All Departments:
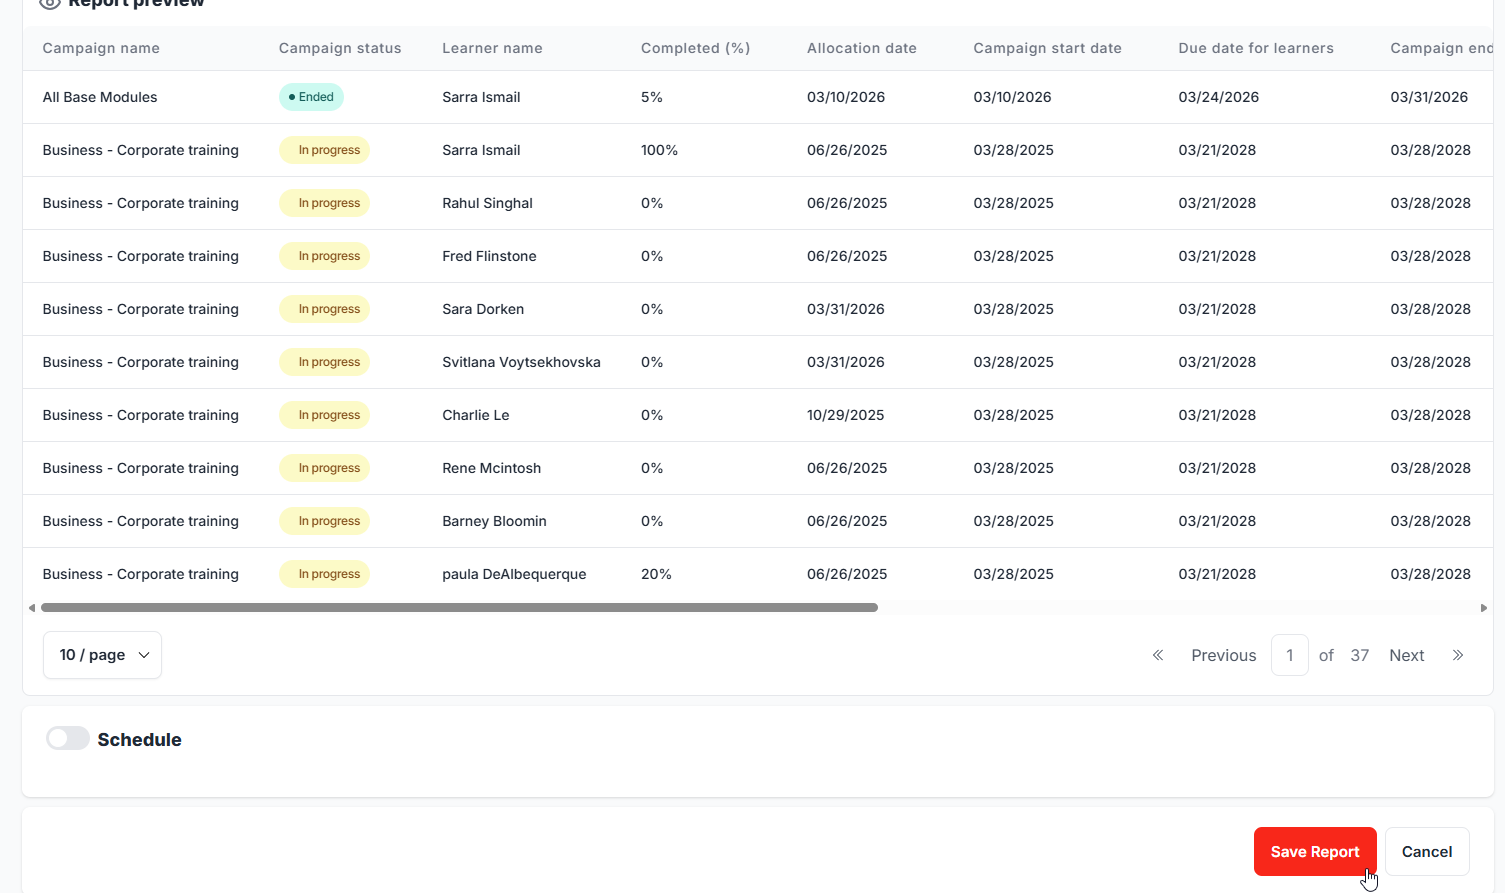
5.) Scroll down and select the Save Report button:
The Saved Reports page is displayed:
6.) Select Download from the Actions button on the right:
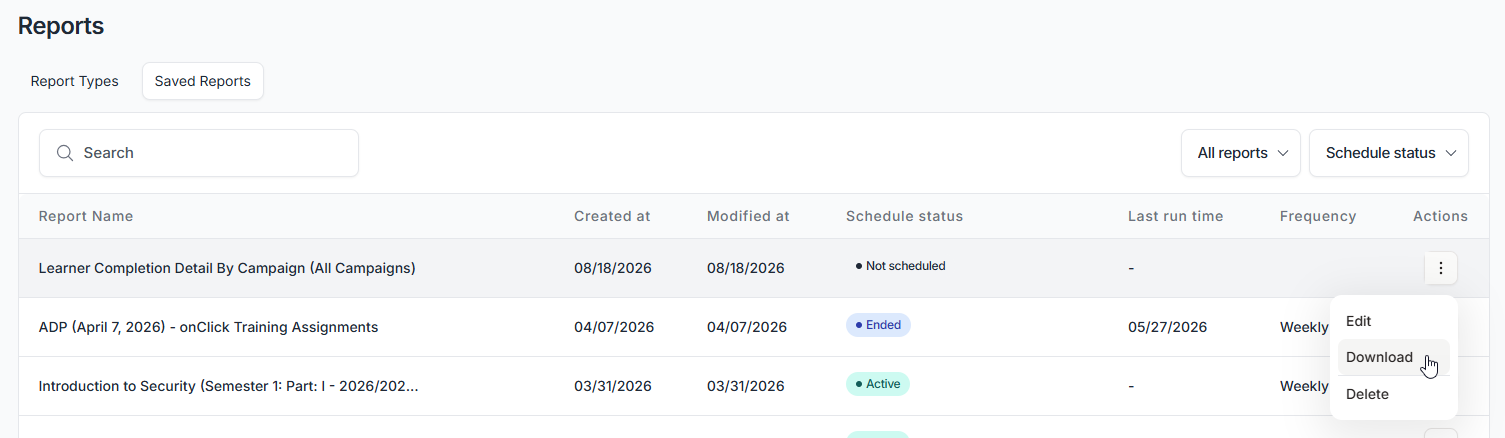
You have now downloaded your completion data. Save this file in a secure location and back it up.
STEP 2 (Recommended): Delete your custom training url and associated 'A' record
NOTE: Once you complete this step, users will no longer be able to access this service.
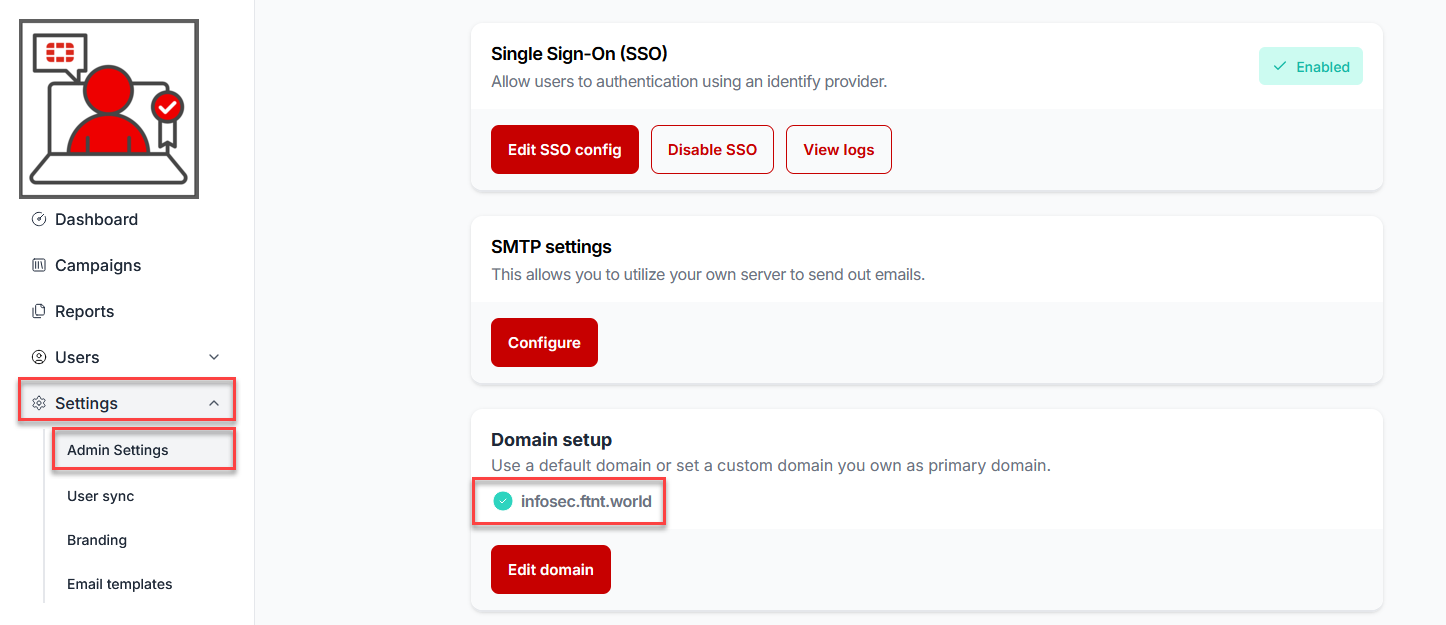
If you configured a custom url (training sub-domain) for your training service, you should delete the domain from the service and delete the associated 'A' record you created. You may wish to re-configure the entry if you plan to set up the new service: https://fortisat.forticloud.com
1.) Log in to the service using the associated FortiCloud (master user) account: https://ftnt.info
This is the FortiCloud account that was used to enter the service contract / license and initialize the service. If you have forgotten your password, you will need to use the password reset link. If you still cannot access your account, you should send an email to cs@fortinet.com (from the email in question) requesting assistance recovering your account.
2.) Under the Settings in the left hand side navigation menu, select Admin Settings:
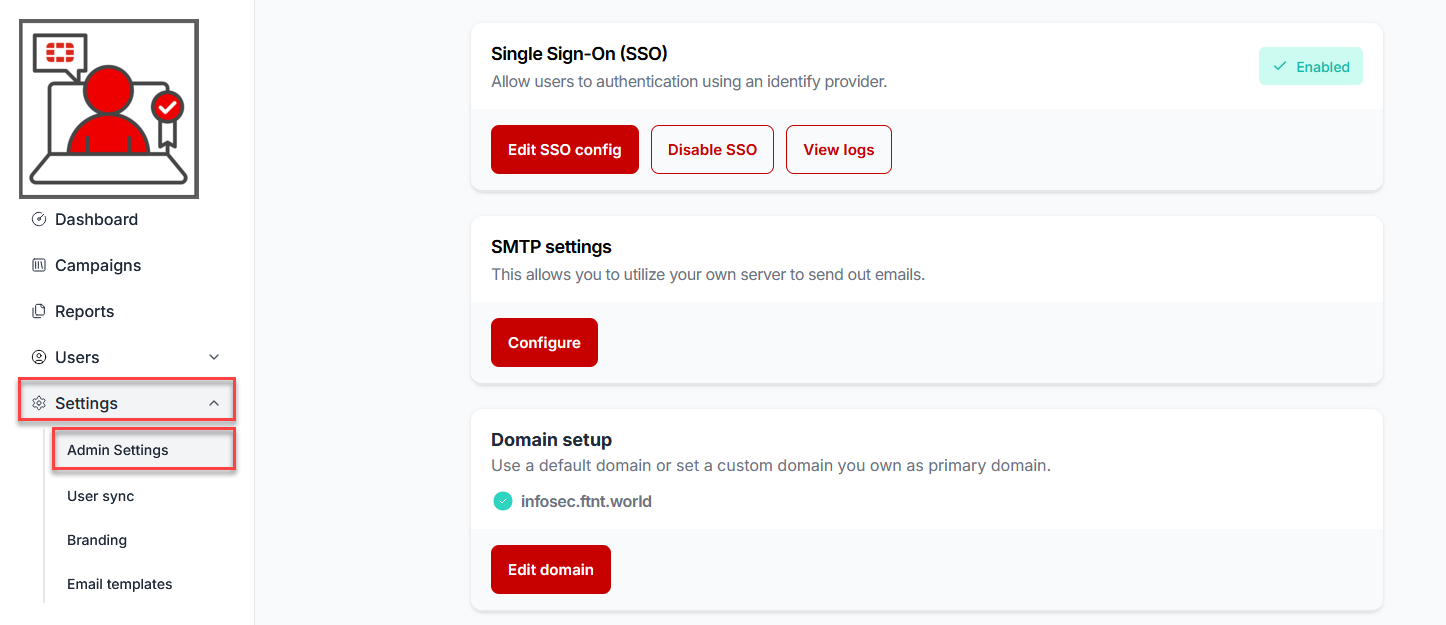
3.) Log in to your DNS service providers administrative/management console, locate the A record(s) and delete the A record entry(s) that correspond to your custom domain specified in the Domain setup section. In the example above, we would delete the three A records that map an IP address to the custom domain: infosec.ftnt.world
STEP 3 (Recommended): Delete your 3rd Party Single Sign-on (SAML2 application)
If you configured a 3rd party application (Microsoft Entra/AzureO365 Enterprise App or Google Workspace Web and Mobile App or OKTA, etc.), you can delete the application. The instructions for these steps will depend on what 3rd party SSO method you configured.
You may also wish to reconfigure the existing application when configuring the new service: https://fortisat.forticloud.com
Optionally, you can request that we assist with the deletion of your SSO application. In order to request help, please Click to Email
NOTE: We will only accept requests from the registered tenant administrator email account.
STEP 4 (Recommended): Delete your DNS TXT record(s)
In order to send emails from the system, you were required to create a DNS TXT token using our system in order to create a DNS TXT record. You should delete this DNS TXT entry. You may wish to re-configure this DNX TXT record if you plan to set up the new service: https://fortisat.forticloud.com
1.) Log in to the service using the associated FortiCloud (master user) account: https://ftnt.info
This is the FortiCloud account that was used to enter the service contract / license and initialize the service. If you have forgotten your password, you will need to use the password reset link. If you still cannot access your account, you should send an email to cs@fortinet.com (from the email in question) requesting assistance recovering your account.
2.) Select Domains under the Users navigation menu item to view your verified domains:
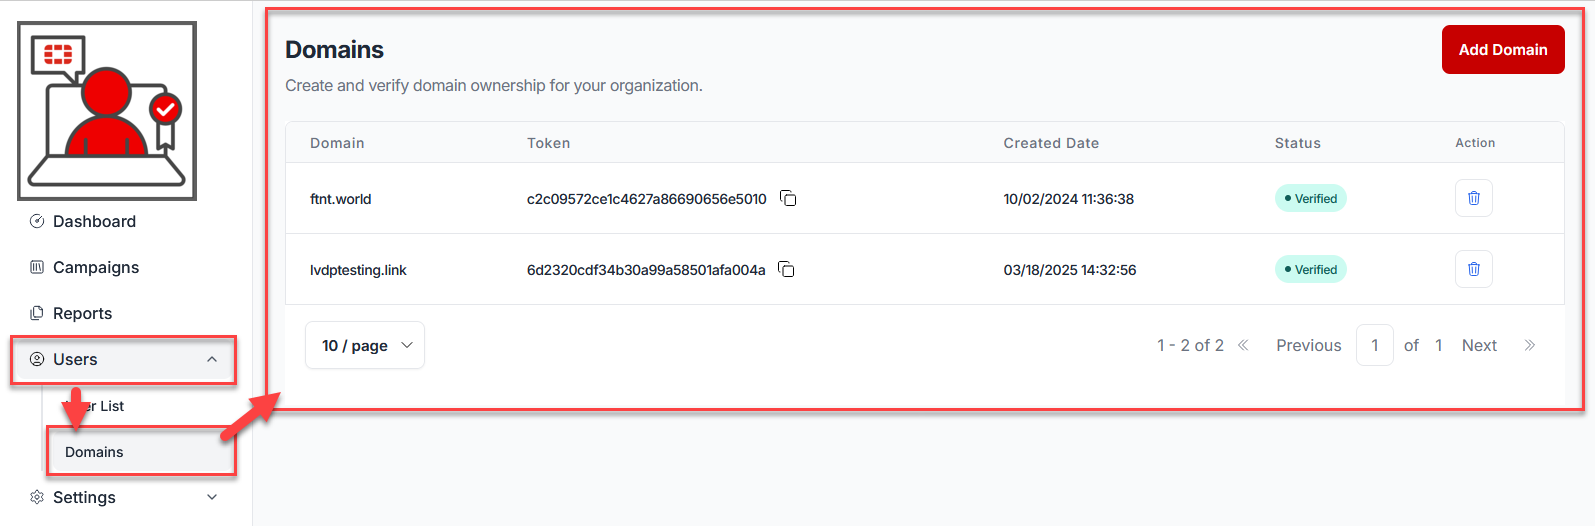
3.) Record the domain(s) and token(s) listed in the entry. You may wish to copy and paste these entries into a txt file or other for reference.
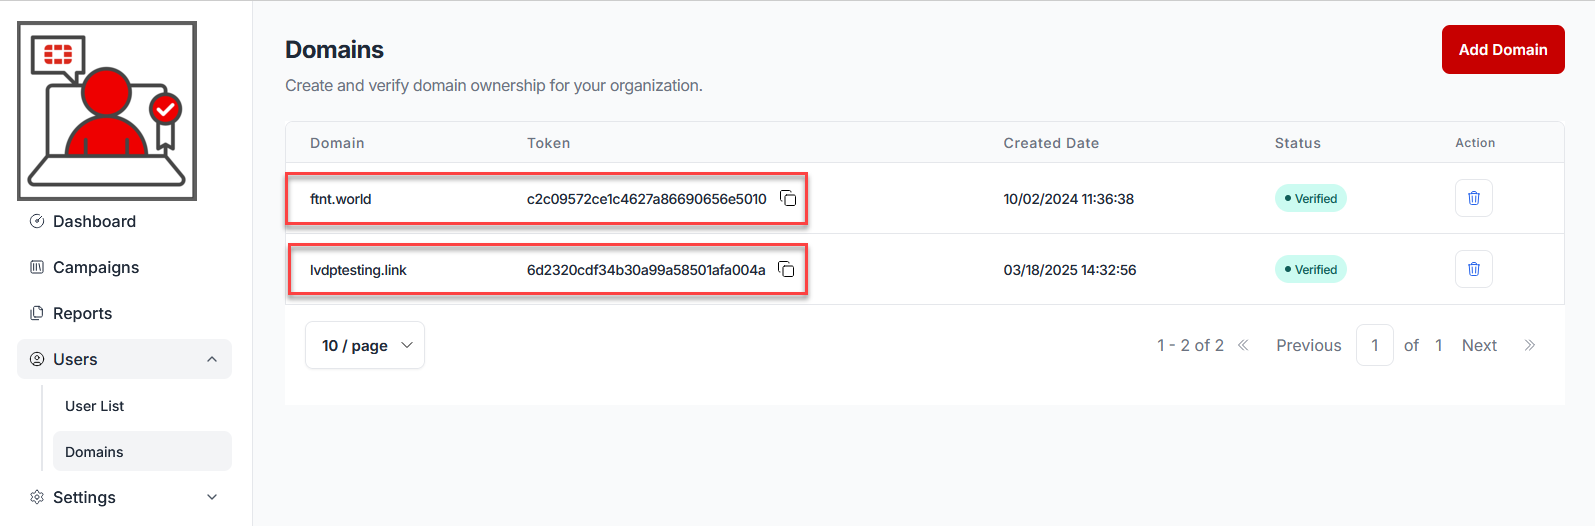
4.) Select the trash can icon to delete the entry.
5.) Log in to your DNS service providers administrative/management console, locate the DNS TXT record(s) and delete the entry(s).
STEP 5 (Recommended): Delete your firewall rule for LDAP/S access
If you imported your users from an LDAP Directory (Active Directory) you likely needed to create a firewall rule to allow our service to connect to the Active Directory to harvest and sync your user base.
We recommend you delete this firewall rule.
Delete the rule in your firewall(s) configuration(s) that allows traffic to your LDAP Directory (default port 389 (LDAP) or 636 (LDAP/S (secure ldap)) from our service at IP addresses:
54.69.233.204
35.165.54.209
35.81.112.57
STEP 6 (Optional): Delete your users
You may wish to delete your users. The method you use to delete users will depend on the method you used to import users.
If you do not delete them, they will be deleted when the tenants are deleted.
If you added users manually or via a .CSV import, you will need to delete the users manually. This can be done from the Users navigation menu item:
NOTE: You cannot delete the tenant administrator account. This is the FortiCloud account that was used to register the licenses and initialize the service. E.g. In the screenshot above, Sarra Ismail cannot be selected / deleted.
If you added the users via an LDAP import / synchronization configuration, you need to delete the LDAP configuration:
1.) From the left-hand side navigation menu, select the Users menu item, then select user
NOTE: We will only accept requests from the registered tenant administrator email account.
Was this article helpful?
That’s Great!
Thank you for your feedback
Sorry! We couldn't be helpful
Thank you for your feedback
Feedback sent
We appreciate your effort and will try to fix the article